Showing posts with label main course. Show all posts

Sunday, December 14, 2014

SWEET POTATO RISOTTO, MINT + WALNUT GREMOLATA


Sweet potato risotto is a terrific seasonal variation on risotto. The sweet flavour and creamy texture of the sweet potato complements the risotto really well. Walnuts and sweet potatoes are in season in the autumn - and they pair exceptionally well in this savoury risotto-gremolata combo. A sure favourite!

Risotto is prepared with any Italian starchy, short-grained rice - the most common rice varieties used for risotto are carnaroli or arborio. To properly cook risotto you stir hot broth into the uncooked rice a ladleful at a time and cook slowly. As the liquid is nearly absorbed, add in the next ladleful. This slow cooking and stirring releases the natural starches in the rice and makes the risotto creamy, velvety and irresistible... well, that and the cheese!!

Risotto is best served immediately or soon after cooking because it will become clumpy if made in advance. A properly cooked risotto makes a soft, creamy mound without running across the plate. It also should not be too hard, crunchy, or gummy.

Gremolata is an Italian condiment of chopped fresh herbs, lemon zest, garlic, and a bit of olive oil. In the spirit of other similar condiments like pistou, persillade, any kind of pesto, Indian chutneys, etc. it's simple but packs a punch of brilliant fresh flavour! Ossobucco with gremolata and risotto is a classic Milanese meal! Here I've made it seasonal and vegetarian - I usually serve this risotto with roasted cauliflower or roasted chicken with kale (photo below).


Sweet Potato Risotto, Mint + Walnut Gremolata
makes: 4-5 cups (a typical serving of risotto is 1 cup)

- 2 cups peeled and diced sweet potato 
- 2 cups carnaroli or arborio rice
- 5-6 cups vegetable or chicken broth
- 1-1/2 cups dry white wine (like a Pinot Grigio)
- 2 cloves garlic, minced
- 1 small white or yellow onion, diced
- 1 tbsp. butter
- 2 Tbsp olive oil
- 1 cup grated Parmigiano Reggiano cheese
- 1 tbsp. freshly ground pepper
- 2 tsp. crushed red pepper flakes (optional)
- salt, to taste
  1. Heat the olive oil in a large pan. When it's hot, add the onion and garlic and sauté on low heat for 1-2 minutes so the onion doesn't brown. Add the sweet potatoes and red pepper flakes and continue to sauté.
  2. Heat the broth in a saucepan, and adjust the heat so it remains at a simmer.
  3. When the onion is translucent, add the rice and sauté for 3-4 minutes, stirring frequently so that the rice doesn't brown or stick to the pan.
  4. Once the rice is coated with oil, add the wine and cook for a few minutes, stirring frequently, until the wine is absorbed.
  5. Add 1 cup of the hot broth to the rice and stir until it is absorbed. Stir constantly so that the rice doesn't scorch or stick to the pan. Add the next cup of broth as soon as the rice has absorbed the broth but don't wait till the rice is dry - you should see a sheen of liquid in the rice.
  6. Continue adding broth by the cup and stir while the liquid is absorbed, then add more broth when the rice is almost dry. The rice will start getting a creamy consistency as its starch is released. Cook the rice this way until until the rice is tender but still firm to the bite - without being crunchy or tasting raw. If you run out of broth before the risotto is done, use hot water to finish cooking, stirring while it's absorbed.
  7. Stir in the pepper, butter, and cheese, and season to taste with salt. Serve garnished with a tbsp. of gremolata (recipe below) and a grind of black pepper.
Mint + Walnut Gremolata
makes: approximately 1/2 cup

- 2 tbsp. lemon zest (zest from one lemon) 
- 2 cloves garlic, crushed into a paste
- 1/4 cup finely chopped walnuts
- 1/2 packed cup mint
- 1/2 packed cup parsley
- 1/4 cup olive oil
  1. Finely chop the parsley and mint.
  2. In a bowl, mix the chopped parsley, mint, and all the other ingredients. Refrigerate until ready to use.

Tuesday, November 12, 2013

HOW TO ROAST A WHOLE PUMPKIN, AND PUMPKIN SOUP


The pumpkin roasts itself, and the soup nearly makes itself! Can't get much easier - and more autumn - than this. You can roast, peel, and cut the pumpkin a day or two before and store it in the fridge to save on prep time.

Serve with grilled cheese or baked polenta with vegetables for an easy weeknight dinner.

Any winter squash - butternut, acorn, delicata, spaghetti squash - can be roasted like this. Smaller squashes will take less time so keep an eye on the oven, checking the squash periodically after the initial 30 minutes of cooking.


Roasted Pumpkin and Pumpkin Soup
Makes: 6 generous servings

- 1 6 lb sugar pumpkin or any other cooking pumpkin
- 32 oz. vegetable broth
- 1 medium yellow onion, cut into large chunks
- 3 cloves garlic, cut into a few large pieces
- 1 tbsp. coconut oil (or any other cooking fat of choice)
- 2 tsp. salt
- 1-1/2 tsp. curry powder
- 1 tsp. cumin powder
- 1/2 tsp. cayenne pepper
- 1 tsp. sugar

Optional, for garnish:
- 6 tbsp. roasted pumpkin seeds
- Or any one of the following: cream, yogurt, pumpkin oil, shaved Parmigiano Reggiano cheese

Roasted Pumpkin:
  1. Preheat the oven to 375 F / 190 C.
  2. Remove any stickers from the pumpkin, wash, and put the whole pumpkin on a rimmed baking pan and into the oven.
  3. Let it roast for 1 hour or until a knife can be easily inserted into the pumpkin. (If you're making pumpkin soup, now's the time to saute the onions and garlic - see recipe below).
  4. Remove the pan from the oven, and make a couple of cuts in the pumpkin to let steam out.
  5. After 20 minutes or so, cut the pumpkin in half and let the halves cool on the pan.
  6. When it's cool enough to handle, use a spoon to remove the seeds and strings from the seed pocket. Make sure to remove all the stringy bits.
  7. Cut each pumpkin half into 3 wedges and pull the skin off. The skin will be papery and separate already from roasting so it'll come right off without a knife.
  8. Make pumpkin soup (recipe below).
  9. Or, mash or blend the pulp and use within 2 days or freeze immediately up to a month.
Roasted Pumpkin Soup:
  1. While the pumpkin is roasting, heat the coconut oil (or whatever cooking fat you're using) on medium heat and sautee the onion and garlic. Let it all cool.
  2. Break the roasted pumpkin wedges (see step 7 above) into pieces and put in a blender.
  3. Add the sautéed onions and garlic, salt, sugar, and all the spices.
  4. Add 2 cups broth or enough to be able to blend everything into a thick purée until no stringy bits or chunks remain. Add the rest of the broth.
  5. If it's too thick, add water (or milk/cream) to get a consistency you like.
  6. Before taking it out of the blender, taste and adjust seasonings, blend it all one last time.
  7. Transfer to a pan and reheat the soup to a simmer.
  8. Ladle into bowls.
  9. Garnish each bowl with a tbsp. of the roasted pumpkin seeds before serving.

Saturday, November 9, 2013

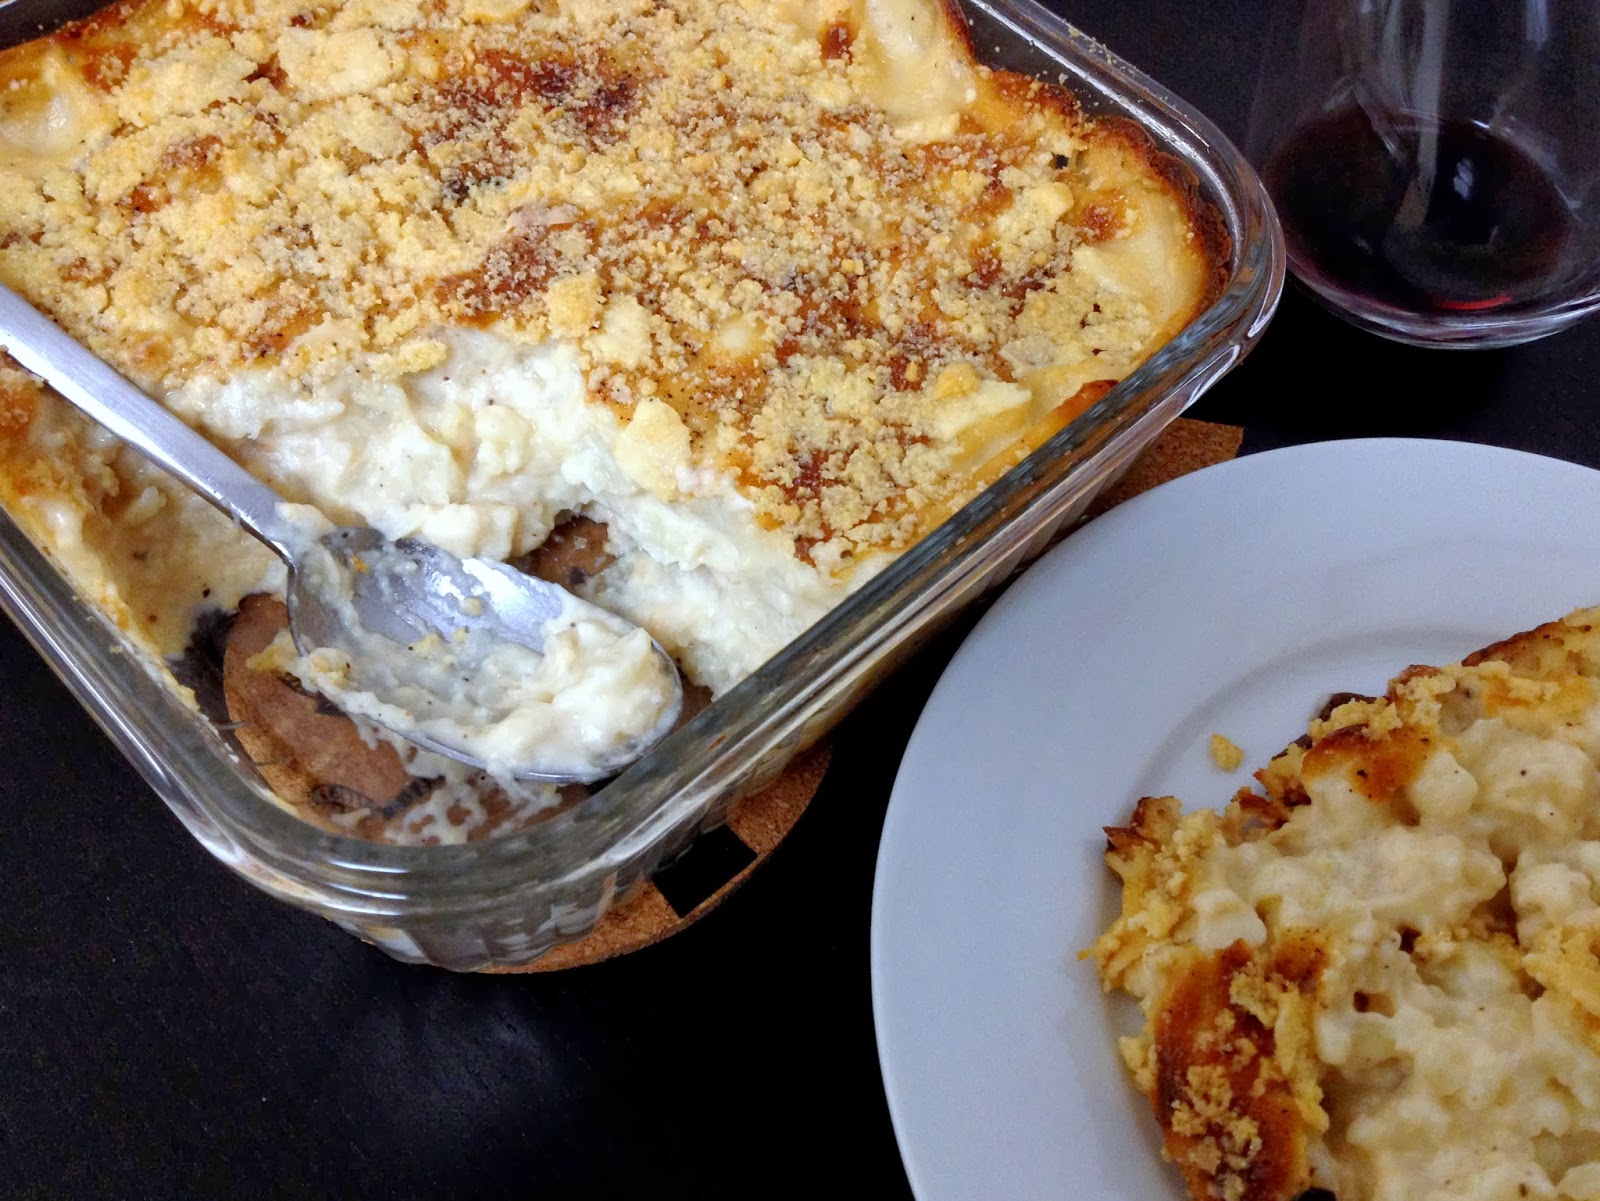
CAULIFLOWER GRATIN OR, HOW TO MAKE BÉCHAMEL SAUCE


Nothing fancy here, just a classic French homey gratin, and as much a comfort food of childhood as now. Gratin refers to the pan in which this is cooked, and so all things cooked in a gratin are gratin. :-) With a salad and perhaps bread, this is an easy dinner. It's a make-ahead kind of dish that can sit in the oven for as long as an hour without drying out thanks to the béchamel sauce.

It's also quite a versatile dish - if you want, add a cubed potato or two to the cauliflower. Traditionally, you rub the gratin pan with garlic but I add minced garlic to the béchamel. Sometimes I add a chopped shallot as well. Contrary to what some recipes say, the classic gratin does not require cream of any kind. Just milk - preferably whole, but at least 2%. Skim milk is a waste of time.

In this gratin the star of the show is the béchamel sauce - one of the mother sauces of French cuisine, best presented in Escoffier's Le Guide Culinaire or his 800 page, 2000 recipe compendium Ma Cuisine. I bought a hardbound old copy of Ma Cuisine for $2 at a used book store in Half Moon Bay years ago. I have no idea why anyone would get rid of this book, but they did, and I scored! Anyway so béchamel is the base of other sauces such as Mornay and soubise. The quality of bechamel however, depends on the quality of the roux. Roux is nothing more than about equal parts of flour and butter - slightly more flour than butter - cooked together to form a binder for the other ingredients. There's brown roux, pale roux, and white roux. The color of the roux, logically, will determine the colour of your sauce.

Gratins such as potatoes dauphinoise, this cauliflower gratin, and other recipes where béchamel sauce is used, require a white roux which is used for white sauces. A brown roux is used for dishes that call for a brown sauce, and a pale roux is used for veloutés - velvety cream sauces.

Béchamel is really easy to make once you can make roux correctly. Cook the roux on a low-medium flame, never medium or high. You want to allow time for the starch cells in the flour to burst so that the butter combines with the starch without burning the starch (which high heat will do, and therefore require more roux in your béchamel which therefore will be really sludgy and overpower the other ingredients). You will see that as the starch and butter combine, the flour-butter mixture goes from the initial large clump to a soft, loose, stir-able mixture. And it will smell nutty. 


It's very important to keep an eye on the roux when it starts to smell nutty because then it will turn colour from white to brown - which we don't want for béchamel. So once it's loose and stir-able, cook for a minute or so and add the milk, salt, pepper, and whatever seasonings and spices you're using.


Cauliflower Gratin: Gratin de Chou-Fleur
Makes: 4 servings

- 1-1/2 lbs florets of white cauliflower
- 5 tbsp unsalted butter
- 6 tbsp all-purpose flour
- 3 cups milk, 2% or whole
- 1-1/2 tsp sea salt or any other good quality salt
- 1 tsp freshly ground black or white pepper
- 1/4 tsp grated nutmeg
- 1 clove garlic, minced or chopped
3 cloves, whole (don't use powdered!)
- 1/4 cup shallot, finely chopped (optional)
- 1/2 cup grated Comté, Gruyere, Emmenthaler, or Pecorino Romano cheese
  1. Preheat the oven to 350 F / 180 C.
  2. Boil a generous amount of water - enough to completely submerge the cauliflower - in a large stainless steel pan and add the cauliflower florets. Bring everything to a boil, and cook, uncovered, for about 5 minutes. Drain and set aside. Or you can steam the cauli for 5 minutes.
  3. Melt the butter in a medium saucepan. Add the flour and cook over low heat for about 2 minutes, stirring with a whisk. Don't let the mixture brown - it should be white, maybe very slightly off-white. 
  4. When the flour-butter mixture feels and looks loose and smells nutty, add the milk and bring to a boil over medium heat, stirring constantly to prevent it from burning or sticking to the pan.
  5. Simmer over low heat for 2 minutes. Add the salt, pepper, nutmeg, garlic, and cloves if using. Bring to a boil. Remove from the heat.
  6. At this point you can remove the whole cloves if you want, but I always leave them in because they don't overpower the flavour and give the gratin a warm fragrance which I love.
  7. Generously butter or oil a gratin dish. Put half of the cauliflower florets in the dish and evenly pour half of the béchamel over the florets.
  8. If using shallots, sprinkle the chopped shallots over the béchamel, add the remaining cauliflower florets and evenly pour the remaining béchamel over the florets.
  9. Sprinkle with the cheeses and bake for about 30 minutes, or until golden brown.
  10. Pull the bubbling gratin out of the oven and let it stand for 10-15 minutes before serving.
  11. Enjoy!

Tuesday, October 1, 2013

BETTER THAN MAC-N-CHEESE: ORECCHIETTE WITH ROOT VEGETABLE SAUCE

Cheesy? Dairy-free? Lowfat? Vegetarian? Vegan? Gluten-free? Yeast-free? Totally delicious? Easy? All of those is what this recipe is! Just make this - you're going to love it! I've served it plenty of times to my dairy- and dairy-free friends, no one can tell that there's not a morsel of cheese in this mac-n-cheese.

I used orecchiette but any short-ish pasta with a texture that allows sauce to cling on to will do: Maccheroni, fusili, rigatoni, radiatori, conchiglie, cavatelli, casarecci, gemelli, ruote... whatever strikes your fancy. Or whatever you've got waiting to be cooked... or whatever the market has for you.


Orecchiette with Root Vegetable Sauce
Makes: 6 generous servings

Sauce:
- 4 cups water
- 1/2 cup raw cashews
- 1 shallot
- 2 medium red or yellow potatoes
- 3-4 small (2 medium) carrots
- 1 medium yellow or white onion
- 5 cloves garlic
- 1 tbsp. Dijon mustard
- 1 lemon, juiced
- 1 tsp. black pepper
- 2 tsp. crushed red pepper
- 2 tsp. good quality salt
- 1 tbsp. olive or grapeseed oil

Pasta:
- 4 quarts water
- 16 ounces orecchiette

Topping:
- 2 slices of bread, torn into large pieces

1. Soak cashews in 1 cup water.
2. Cut all the vegetables except garlic into roughly evenly sized pieces.
3. Bring 3 cups of water to a rolling boil in a large saucepan.
4. Add the cut vegetables and 4 cloves of garlic to the boiling water. There's no need to cut the garlic, add the cloves whole.
5. Bring everything to a boil.
6. Lower the heat to medium-high and cook until vegetables are soft.
7. Remove the vegetables from the heat and allow to cool almost completely.
8. Do not drain vegetables.
9. Add the cashews, 1 clove of garlic, cooked vegetables and water, salt, and all the seasonings to a blender.
10. Blend on high until everything is a smooth paste. SAUCE!!
11. Preheat oven to 350 F/180 C.
12. Bring the 4 quarts water to a rolling boil.
13. Add the orecchiette and cook until al dente. Thoroughly drain the pasta.
14. Process the bread in a food processor or blender to make breadcrumbs.
15. Mix the drained pasta with the sauce and put in a 9 in. x 13 in. baking pan. I prefer a glass or ceramic pan but metal will do I suppose.
16. Top with the breadcrumbs and bake for 30 min. or until the sauce starts to bubble.
17. Remove from the oven and enjoy!

Notes:
1. Make the sauce ahead of time and thin if required before mixing in cooked pasta.
2. Make this gluten-free: use gluten-free pasta and breadcrumbs.
3. Mix in other vegetables along with the sauce and pasta: kale or chard torn into pieces, spinach, lightly steamed broccoli, or even cauliflower florets.
4. Make it vegan: make sure to use eggless pasta.

Thursday, September 5, 2013

RICE, RED LENTILS, AND VEGETABLES WITH RAS EL HANOUT

Ras el hanout meaning 'best of the shop' is a Moroccan spice blend that, much like Indian garam masala or even American barbecue rubs, has endless regional variations. It does have staple ingredients including turmeric, allspice, nutmeg, cinnamon, coriander, cloves, paprika, cardamom, with other things like rose buds, saffron, and various berries or pepper mixed in based on the region and blender's choice.

I'm no expert on ras el hanout but one day when I was shopping at the Rainbow co-op market where I normally shop, and often stare at the countless spices they have in bulk, I saw ras el hanout. I'd heard of it and read about it but never cooked with it... so what? Rome wasn't built in a day, was it?

Rainbow not only allows but encourages shoppers to bring their own containers. In addition to my usual olive and coffee jars, I'd brought along a few spice jars that were running on empty, and I had an extra one so in went a very generous amount of ras el hanout.

FFwd to last night. First day back in office after a few weeks of being at various project sites with 14 hour days starting at 5 AM that involve no sitting but a lot of climbing, squatting, kneeling, and walking in all varieties of the summer sun. And of course, I was eating out at every meal. So when I finally got into the kitchen I was craving something warm, nourishing, and comforting. Something casserole-y, something like risotto, something like khichadi, something aromatic, something easy to make, not too laborious. Enter rice, lentils, ras el hanout... and me.


Rice, Red Lentils, and Vegetables with Ras el Hanout
Servings: 4, as a main dish

- 1/2 cup Jasmine rice or other rice of choice
- 1/2 cup red lentils
- 2 shallots or 1 small yellow onion, sliced
- 2 large cloves garlic, minced
- 1-1/2 tsp. caraway seeds
- 1-1/2 tsp. fennel seeds
- 1 tbsp. or more, ras el hanout
- 1 tsp. turmeric (optional)
- 1 tsp. red pepper powder, or crushed 'flakes'
- 1 tbsp. ghee or expeller-pressed virgin coconut oil (or any other high temperature cooking oil - NOT olive oil)
- vegetables of your choice, diced
- 2 tbsp. flame raisins
- 2 cups water, or enough to completely cover the rice, lentils, and vegetables (see #10 below)
- 3 tbsp. fresh parsley, chopped

1. Put the rice and lentils in a bowl and rinse until the water runs nearly clear. Drain.
2. Add warm/hot water to the bowl enough to cover the rice and lentils and let everything soak while you prep the vegetables. The hottest kitchen faucet water is hot enough for this.
3. Cut the vegetables into chunks that are fairly same-sized, so that they cook uniformly.
4. Heat the coconut oil on medium heat in a large pan, till a fennel seed dropped into it sizzles.
5. Add the fennel and caraway seeds and let them sizzle until you can smell the aroma.
6. Add the shallot and garlic and saute till the shallot is translucent and is just getting a bit brown.
7. Add the cut vegetables and spices and saute everything for 5 minutes. Stir often enough to prevent vegetables from sticking to the pan or burning.
8. Drain the rice and lentil mixture.
9. Add to the pan and saute on medium-low heat for 2-3 minutes along with the vegetables.
10. Add enough water to cover the rice, lentils, and vegetable mixture.
11. Turn the heat to high. When everything starts to bubble a bit, turn the heat to low.
12. Cover and cook on low for 10-15 minutes.
13. Uncover, add the raisins and give it all a quick stir.
14. If the rice isn't cooked yet, cover the pan and let everything cook for another 5 minutes or so.
15. When it's cooked, turn off the heat and add the chopped parsley.
16. Enjoy!


Monday, August 12, 2013

KING SALMON IN FIG LEAVES, ROASTED FETA-STUFFED FIGS

This recipe looks deceptively complicated... from washing the fig leaves to eating, it took all of 20 - 25 minutes! The roasted, feta-stuffed fresh figs are just as quick to whip up, and so addictive! Figs, unlike bananas, peaches, nectarines, and many other fruits, don't ripen off the tree. So if you buy figs in a package, chances are you've got a few less-than-perfectly-ripe ones. And those semi-ripe ones are not the best for eating raw. But they're perfect for roasting because it brings out the sweetness even in slightly unripe figs. And, the saltiness of the feta and peppery arugula leaves complement the honey-like flavour of roasted figs.

Fig leaves are so under-rated and overlooked... the leaves themselves are not the best for eating, but they are perfect for cooking. They look stunning, have a delicious warm coconut-y aroma when they're roasted, and hold up very well so no dealing with a lost sauce. 

I've roasted salmon and monkfish in fig leaves and they're both winners! During fig season, most farmer's markets and specialty grocery stores sell fig leaves. If you're in California, chances are you, a neighbour, or someone-you-know's neighbour has a fig tree or two. So then you have fig leaves whenever you want... or at least, often. Or maybe someone you know works at a project site with fig trees and rosemary hedges and lemon trees and olive trees and apple trees and avocado trees nearby. It can happen.


King Salmon in Fig Leaves, Roasted Feta-Stuffed Figs
Servings: 2

for the salmon:
- 2 4 oz. filets of King Salmon or any other salmon, preferably skin-on
- 2 large fig leaves (or 4 medium)
- 1 lemon, preferably organic
- 1 tbsp. olive oil
- freshly ground black pepper, to taste
- salt, to taste

for the figs:
- 8 or 10 fresh, ripe or slightly unripe figs, washed
- 1 sprig fresh rosemary, or 1 tbsp. dry rosemary, chopped (optional)
- 4 oz. feta or chevre 
- 1/2 lemon, juiced
- 1 tbsp. freshly ground black pepper
- 2 cups arugula (or other greens)


1. Preheat oven to 350 F/180 C.
2. Rinse fig leaves and pat them dry.
3. Slice the ends off the lemon, slice the lemon into approximately 8 thin slices.
4. Lay a fig leaf flat on a cutting board, plate, or directly on the baking tray.
5. Place the salmon lengthwise on the centre of the fig leaf and generously season with salt and pepper.
6. Arrange 4 of the lemon slices on the salmon, overlapping each slice.
7. Drizzle 1/2 tbsp. olive oil over the salmon.
8. Wrap the top of the fig leaf over the salmon, then wrap the sides, and then the stem-end. You should now have a neat salmon packet.
9. Flip so that the seams are facing down to keep the packet closed during cooking.
10. Repeat with the second filet.
11. Now work on the stuffed figs. You can stuff the figs first, then prep the salmon but the cheese stuffing might get runny - it'll still be good.
12. Slice the stem-end off each fig and cut an X into the fig, stopping short of cutting all the way through.
13. Set each fig down, cut side up, and gently squeeze the round base of the fig so the fig 'crowns' or opens up for the filling (check out the photos above for crowned figs)
14. Put the feta, rosemary, pepper, and lemon juice in a bowl. Mash and mix well.
15. Stuff each fig with about 1 tsp. of the feta mixture, taking care not to tear the fig open all the way. Divide any leftover mixture between the figs. 
16. Put both filets and the stuffed figs on the baking tray and into the oven for 15 - 20 minutes. Since the salmon is wrapped, it won't dry out in 20 minutes, but don't cook it for much longer than that.
17. Remove from the oven.
18. Mound 1 cup of arugula on a plate, leaving room for the wrapped salmon.
19. Arrange 4-5 roasted figs on the arugula leaves.
20.  Flip the salmon seam-side up onto the serving plate next to the figs.
21. Unwrap the salmon and enjoy! Discard the fig leaves though... they're not that good.