Saturday, October 12, 2013

MOIST CHOCOLATE BANANA CUPCAKES

There isn't a whole lot to say about this recipe... except that it's fantastic! I adapted it from a recipe on the Joy of Baking website (link below, just before the recipe). I used a vanilla frosting, but the one on the website sounds delicious, and as are most recipes on the website, it's very manageable. Although this recipe says it's for cupcakes, it's my go-to recipe for a moist, delicious chocolate cake. This recipe makes one 8 in. round cake.

The hot water makes a difference because it activates the cocoa and draws out the chocolate-y flavour without being over-bearing. Also, butter, olive oil, or coconut oil are really the only fats I use for baking. Generally, if a recipe calls for oil, I use olive oil. I always have it at hand, and it's got natural emulsifiers that results in cakes with a moist crumb even after refrigeration. And no, you won't get an olive oil flavour in your cake at all.

I used *very* ripe bananas for the best flavour. Really ripe. Blackened skin ripe. Blackened skin, soft to the touch ripe. But really, even if your bananas have lots of black spots on them, they're fine to use. Don't bother using unripe bananas... won't work.


Moist Chocolate Banana Cupcakes
Servings: 12 regular cupcakes, 24 mini cupcakes

Adapted from this recipe.

**See Notes for additional information on sugar, oil, and eggs**

- 1 cup all-purpose flour
- 3/4 cup demerara sugar
- 1/3 cup cocoa powder, unsweetened regular or Dutch-processed
- 3/4 tsp baking powder
- 3/4 tsp baking soda
- 1/4 tsp salt
- 1 large egg
- 2 medium sized ripe bananas, mashed
- 1/2 cup hot water, not boiling
- 1/4 cup milk
- 1/4 cup olive oil
- 3/4 tsp vanilla extract
- 3/4 tsp almond extract (optional)

1. Preheat oven to 350 F/180 C.
2. Line 12 regular or 24 mini muffin cups with paper liners, butter each cup, or spray with your favourite non-stick vegetable spray.
3. In a large bowl mix well the dry ingredients - sugar, flour, cocoa powder, baking powder, baking soda, and salt.
4. In another large bowl, whisk together the wet ingredients except hot water - eggs, mashed banana, milk, oil, vanilla extract and almond extract if using.
5. Add the wet ingredients to the dry ingredients and stir or whisk until combined.
6. Add the hot water and mix. The batter will be quite thin but don't worry it's fine.
7. Pour or spoon the batter into the muffin cups no more than 3/4 full, and bake for about 20 minutes or until a toothpick inserted in the center of a cupcake comes out clean.
8. Remove from oven and let cool on a wire rack.
9. Frost with your favourite frosting - or serve plain with a side of whipped cream or ice cream.

Notes:
1. I always use demerara sugar, but you can also use any other unprocessed sugar like evaporated cane juice. White granulated sugar is heavily processed and I don't recommend it for anything but use it if you must.
2. Olive oil has natural emulsifiers that make cakes moister and softer, so I like using olive oil for baking rather than any other oils. Also, that's really the only oil I always have at hand.
3. I use organic free-range eggs for eating and baking but any eggs will do.

Friday, October 4, 2013

SPICED GHEE

You are what you eat.

The internet is full of information about the importance of ghee in Ayurveda and the many health benefits of ghee so I won't get repetitive about it. But I will say that ghee is one of the best fats your mind and body can have.

This ghee with aromatic spices is wonderful for cooking, in rice dishes, and drizzled over oats or a warm fruit compote. One of my favourite winter breakfasts is rice with ghee, a bit of cayenne pepper, and salt. The spices in the ghee add roundness and warmth to the flavour of food - perfect for the cooler months of the year!

I use 4 cooking fats: ghee, cold expeller-pressed coconut oil, olive oil, and grape-seed oil, in that order. Of the 4, olive oil has the lowest smoke point so I almost never use it for cooking unless I'm sauteeing something at a very low heat or adding it to a soup or stew later in the cooking process and heating everything together.

Ghee and coconut oil have a higher smoke point and don't oxidize easily, and they taste divine in sweet and savoury foods alike.


Spiced Ghee
Makes: approximately 8 oz./1 cup

- 8 oz. organic cow's milk butter, preferably unsalted but salted will do just fine
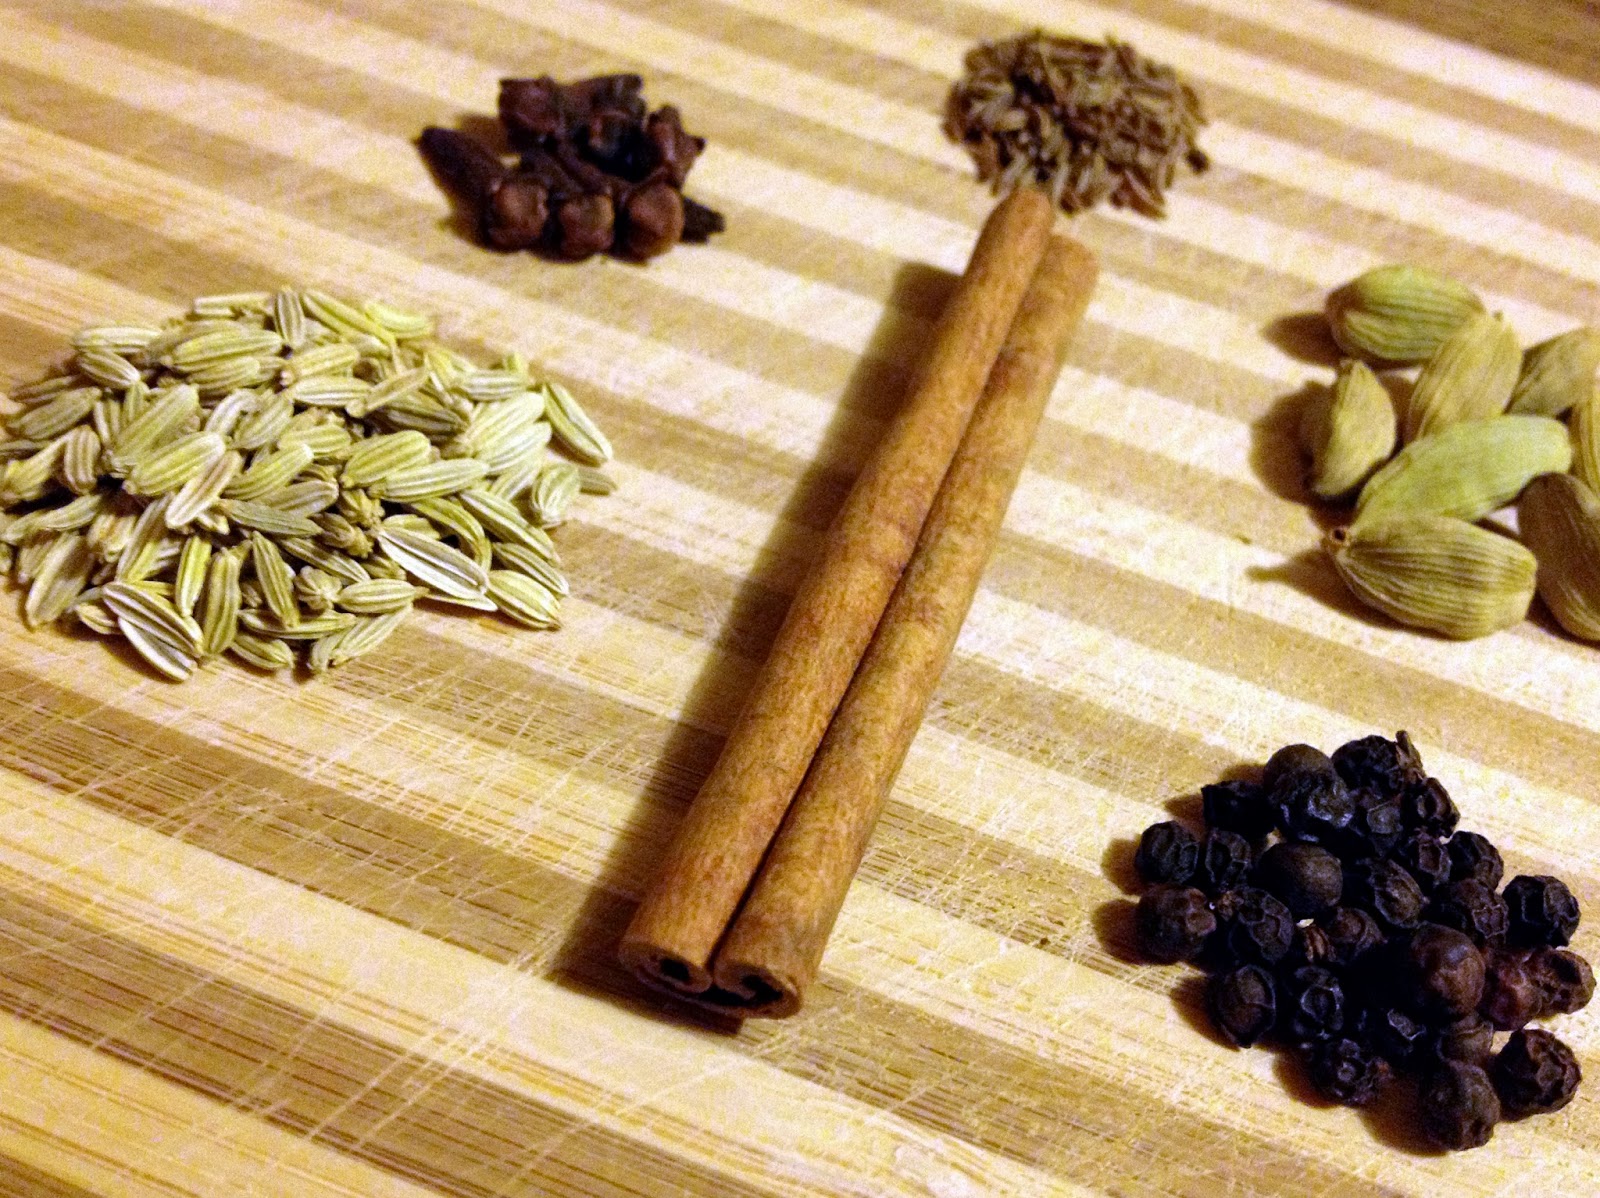
- 1 tsp cloves, whole 
- 1 tbsp cardamom, whole
- 1 tbsp fennel seeds, whole
- 1 tbsp black Tellicherry peppercorns, whole
- 1 tbsp caraway seeds ("shah jeeru" in Gujarati)
- 1 stick cinnamon, 3-4 in. long

- stainless steel pan (cast-iron and enamel may be ok, but definitely not non-stick or aluminium)
- fine mesh strainer

1. In a mortar and pestle, lightly crush the peppercorns, cardamom, and fennel.
2. In the same pan that you will use to make ghee, add all the spices and turn on the heat to low and gently dry-roast the spices till aromatic. This will happen within a minute so keep an eye on things or you'll have burnt-tasting spiced ghee. If you are distracted or short on time, skip this step and add the spices and butter together to the pan. Unroasted spices will affect the final flavour far less than burnt spices!
3. Add the butter, turn the heat up to medium-low and let the butter melt completely.
4. Turn the heat to very low, for the remainder of the process, 25 - 30 minutes. The butter will start to foam and you will hear the butter crackle and pop - this is water evaporating from the butter.
5. Periodically check the butter without stirring: tilt the pan slightly or use a stainless steel or wood spoon to separate the foam so you can see the butter solids and spices. As the butter cooks, the solids will separate and settle, and the butter will get clearer.
6. As more and more water evaporates, the crackling and popping will reduce and the solids at the bottom of the pan will turn caramel in colour. Around 20 - 25 minutes after you start cooking the butter on low heat, the crackling and popping will almost completely stop. The solids will also turn a deep golden colour (not dark brown!).
7. TURN OFF THE HEAT! Deep golden to burnt takes no time at all and that's most definitely going to make the ghee taste burnt. 
8. Using a fine mesh strainer, strain the ghee into a completely dry container. Let the ghee cool completely before putting a lid on the container.
9. Store in a covered container at room temperature. Ghee at room temperature is straw coloured with a semi-liquid texture. If correctly made, it will be easily spoonable at room temperature, no scraping required. Always use a clean spoon to scoop out ghee for use. Ghee does not need to be refrigerated and if it is not exposed to contaminates, it will keep for over a year, even outside the fridge.

Notes:
1. If you don't have a strainer with very fine mesh, improvise by putting a paper towel inside the strainer and strain the ghee through that.

Tuesday, October 1, 2013

BETTER THAN MAC-N-CHEESE: ORECCHIETTE WITH ROOT VEGETABLE SAUCE

Cheesy? Dairy-free? Lowfat? Vegetarian? Vegan? Gluten-free? Yeast-free? Totally delicious? Easy? All of those is what this recipe is! Just make this - you're going to love it! I've served it plenty of times to my dairy- and dairy-free friends, no one can tell that there's not a morsel of cheese in this mac-n-cheese.

I used orecchiette but any short-ish pasta with a texture that allows sauce to cling on to will do: Maccheroni, fusili, rigatoni, radiatori, conchiglie, cavatelli, casarecci, gemelli, ruote... whatever strikes your fancy. Or whatever you've got waiting to be cooked... or whatever the market has for you.


Orecchiette with Root Vegetable Sauce
Makes: 6 generous servings

Sauce:
- 4 cups water
- 1/2 cup raw cashews
- 1 shallot
- 2 medium red or yellow potatoes
- 3-4 small (2 medium) carrots
- 1 medium yellow or white onion
- 5 cloves garlic
- 1 tbsp. Dijon mustard
- 1 lemon, juiced
- 1 tsp. black pepper
- 2 tsp. crushed red pepper
- 2 tsp. good quality salt
- 1 tbsp. olive or grapeseed oil

Pasta:
- 4 quarts water
- 16 ounces orecchiette

Topping:
- 2 slices of bread, torn into large pieces

1. Soak cashews in 1 cup water.
2. Cut all the vegetables except garlic into roughly evenly sized pieces.
3. Bring 3 cups of water to a rolling boil in a large saucepan.
4. Add the cut vegetables and 4 cloves of garlic to the boiling water. There's no need to cut the garlic, add the cloves whole.
5. Bring everything to a boil.
6. Lower the heat to medium-high and cook until vegetables are soft.
7. Remove the vegetables from the heat and allow to cool almost completely.
8. Do not drain vegetables.
9. Add the cashews, 1 clove of garlic, cooked vegetables and water, salt, and all the seasonings to a blender.
10. Blend on high until everything is a smooth paste. SAUCE!!
11. Preheat oven to 350 F/180 C.
12. Bring the 4 quarts water to a rolling boil.
13. Add the orecchiette and cook until al dente. Thoroughly drain the pasta.
14. Process the bread in a food processor or blender to make breadcrumbs.
15. Mix the drained pasta with the sauce and put in a 9 in. x 13 in. baking pan. I prefer a glass or ceramic pan but metal will do I suppose.
16. Top with the breadcrumbs and bake for 30 min. or until the sauce starts to bubble.
17. Remove from the oven and enjoy!

Notes:
1. Make the sauce ahead of time and thin if required before mixing in cooked pasta.
2. Make this gluten-free: use gluten-free pasta and breadcrumbs.
3. Mix in other vegetables along with the sauce and pasta: kale or chard torn into pieces, spinach, lightly steamed broccoli, or even cauliflower florets.
4. Make it vegan: make sure to use eggless pasta.

Friday, September 6, 2013

ZUCCHINI BANANA NUT BREAD

I love baking with olive oil. It has natural emulsifiers that result in very moist and delicious cakes and quick-breads like this one... 

Sometimes I have a toasted, generously buttered slice of this bread for breakfast, or sometimes I make an open-faced sandwich with sliced apples or kiwi fruit. Irresistible!


Zucchini Banana Nut Bread
Makes: 1 9 in. x 4 in. loaf

- 1 cup unbleached all-purpose flour
- 1 cup cake flour
- 1 tsp. cinnamon powder
- 1 tsp. baking soda
- 1/2 tsp. baking powder
1 tsp. salt
- 1/2 cup olive oil (or grapeseed oil or melted coconut oil)
3/4 cup demerara sugar (or regular white granulated sugar)
- 2 eggs
- 2 medium over-ripe bananas
- 2 small zucchini, shredded
- generous splash of vanilla extract

- 1/2 cup almonds (or walnuts/any other nuts) - optional
- 2 tbsp. unsweetened shredded dessicated coconut - optional

1. Preheat the oven to 350 F/180 C.
2. Grease and flour a 9 in. x 5 in. loaf pan.
3. In a bowl, mix together the flours and other dry ingredients except the sugar and reserve for later.
4. In a large bowl, using a spoon mix the oil and sugar till the mixture is creamed - it will feel thickened.
5. Add the vanilla extract and break the eggs directly into the bowl.
6. Mix well till the eggs are completely mixed-in.
7. Peel and dice the bananas - I dice them directly into the mixing bowl.
8. Mix well and mash up the bananas coarsely against the wall of the bowl. Over-ripe bananas should easily mash up.
9. Add in the shredded zucchini and the dry ingredients. Also add in the nuts and coconut if using.
10. Mix well into a batter.
11. Pour into the greased, floured loaf pan.
12. Bake at 350 F/180 C for 1 hour.
13. Remove from the oven and insert a skewer or thin knife into the center of the loaf to check doneness. When the skewer or knife comes out dry, the loaf is done.
14. Let it rest and cool for 15 minutes in the loaf pan.
15. Loosen the sides with a knife and invert the loaf pan over a plate to remove the loaf. 
16. Put the loaf right side up on a cooling rack and let it cool completely, about an hour.
17. Enjoy!

Notes:
1. If you don't have cake flour, you can make it! Here's how: Measure out the all-purpose flour that you’ll need for your recipe. For every cup of flour you measured out, take out two tbsp. of flour and return it to the flour bin. Replace the two tbsp. of flour that you removed with two tbsp. of cornstarch. Sift the cornstarch and flour 4-5 times so that the cornstarch is well mixed with the flour. Et voila! Cake flour!

Thursday, September 5, 2013

RICE, RED LENTILS, AND VEGETABLES WITH RAS EL HANOUT

Ras el hanout meaning 'best of the shop' is a Moroccan spice blend that, much like Indian garam masala or even American barbecue rubs, has endless regional variations. It does have staple ingredients including turmeric, allspice, nutmeg, cinnamon, coriander, cloves, paprika, cardamom, with other things like rose buds, saffron, and various berries or pepper mixed in based on the region and blender's choice.

I'm no expert on ras el hanout but one day when I was shopping at the Rainbow co-op market where I normally shop, and often stare at the countless spices they have in bulk, I saw ras el hanout. I'd heard of it and read about it but never cooked with it... so what? Rome wasn't built in a day, was it?

Rainbow not only allows but encourages shoppers to bring their own containers. In addition to my usual olive and coffee jars, I'd brought along a few spice jars that were running on empty, and I had an extra one so in went a very generous amount of ras el hanout.

FFwd to last night. First day back in office after a few weeks of being at various project sites with 14 hour days starting at 5 AM that involve no sitting but a lot of climbing, squatting, kneeling, and walking in all varieties of the summer sun. And of course, I was eating out at every meal. So when I finally got into the kitchen I was craving something warm, nourishing, and comforting. Something casserole-y, something like risotto, something like khichadi, something aromatic, something easy to make, not too laborious. Enter rice, lentils, ras el hanout... and me.


Rice, Red Lentils, and Vegetables with Ras el Hanout
Servings: 4, as a main dish

- 1/2 cup Jasmine rice or other rice of choice
- 1/2 cup red lentils
- 2 shallots or 1 small yellow onion, sliced
- 2 large cloves garlic, minced
- 1-1/2 tsp. caraway seeds
- 1-1/2 tsp. fennel seeds
- 1 tbsp. or more, ras el hanout
- 1 tsp. turmeric (optional)
- 1 tsp. red pepper powder, or crushed 'flakes'
- 1 tbsp. ghee or expeller-pressed virgin coconut oil (or any other high temperature cooking oil - NOT olive oil)
- vegetables of your choice, diced
- 2 tbsp. flame raisins
- 2 cups water, or enough to completely cover the rice, lentils, and vegetables (see #10 below)
- 3 tbsp. fresh parsley, chopped

1. Put the rice and lentils in a bowl and rinse until the water runs nearly clear. Drain.
2. Add warm/hot water to the bowl enough to cover the rice and lentils and let everything soak while you prep the vegetables. The hottest kitchen faucet water is hot enough for this.
3. Cut the vegetables into chunks that are fairly same-sized, so that they cook uniformly.
4. Heat the coconut oil on medium heat in a large pan, till a fennel seed dropped into it sizzles.
5. Add the fennel and caraway seeds and let them sizzle until you can smell the aroma.
6. Add the shallot and garlic and saute till the shallot is translucent and is just getting a bit brown.
7. Add the cut vegetables and spices and saute everything for 5 minutes. Stir often enough to prevent vegetables from sticking to the pan or burning.
8. Drain the rice and lentil mixture.
9. Add to the pan and saute on medium-low heat for 2-3 minutes along with the vegetables.
10. Add enough water to cover the rice, lentils, and vegetable mixture.
11. Turn the heat to high. When everything starts to bubble a bit, turn the heat to low.
12. Cover and cook on low for 10-15 minutes.
13. Uncover, add the raisins and give it all a quick stir.
14. If the rice isn't cooked yet, cover the pan and let everything cook for another 5 minutes or so.
15. When it's cooked, turn off the heat and add the chopped parsley.
16. Enjoy!


Monday, August 12, 2013

KING SALMON IN FIG LEAVES, ROASTED FETA-STUFFED FIGS

This recipe looks deceptively complicated... from washing the fig leaves to eating, it took all of 20 - 25 minutes! The roasted, feta-stuffed fresh figs are just as quick to whip up, and so addictive! Figs, unlike bananas, peaches, nectarines, and many other fruits, don't ripen off the tree. So if you buy figs in a package, chances are you've got a few less-than-perfectly-ripe ones. And those semi-ripe ones are not the best for eating raw. But they're perfect for roasting because it brings out the sweetness even in slightly unripe figs. And, the saltiness of the feta and peppery arugula leaves complement the honey-like flavour of roasted figs.

Fig leaves are so under-rated and overlooked... the leaves themselves are not the best for eating, but they are perfect for cooking. They look stunning, have a delicious warm coconut-y aroma when they're roasted, and hold up very well so no dealing with a lost sauce. 

I've roasted salmon and monkfish in fig leaves and they're both winners! During fig season, most farmer's markets and specialty grocery stores sell fig leaves. If you're in California, chances are you, a neighbour, or someone-you-know's neighbour has a fig tree or two. So then you have fig leaves whenever you want... or at least, often. Or maybe someone you know works at a project site with fig trees and rosemary hedges and lemon trees and olive trees and apple trees and avocado trees nearby. It can happen.


King Salmon in Fig Leaves, Roasted Feta-Stuffed Figs
Servings: 2

for the salmon:
- 2 4 oz. filets of King Salmon or any other salmon, preferably skin-on
- 2 large fig leaves (or 4 medium)
- 1 lemon, preferably organic
- 1 tbsp. olive oil
- freshly ground black pepper, to taste
- salt, to taste

for the figs:
- 8 or 10 fresh, ripe or slightly unripe figs, washed
- 1 sprig fresh rosemary, or 1 tbsp. dry rosemary, chopped (optional)
- 4 oz. feta or chevre 
- 1/2 lemon, juiced
- 1 tbsp. freshly ground black pepper
- 2 cups arugula (or other greens)


1. Preheat oven to 350 F/180 C.
2. Rinse fig leaves and pat them dry.
3. Slice the ends off the lemon, slice the lemon into approximately 8 thin slices.
4. Lay a fig leaf flat on a cutting board, plate, or directly on the baking tray.
5. Place the salmon lengthwise on the centre of the fig leaf and generously season with salt and pepper.
6. Arrange 4 of the lemon slices on the salmon, overlapping each slice.
7. Drizzle 1/2 tbsp. olive oil over the salmon.
8. Wrap the top of the fig leaf over the salmon, then wrap the sides, and then the stem-end. You should now have a neat salmon packet.
9. Flip so that the seams are facing down to keep the packet closed during cooking.
10. Repeat with the second filet.
11. Now work on the stuffed figs. You can stuff the figs first, then prep the salmon but the cheese stuffing might get runny - it'll still be good.
12. Slice the stem-end off each fig and cut an X into the fig, stopping short of cutting all the way through.
13. Set each fig down, cut side up, and gently squeeze the round base of the fig so the fig 'crowns' or opens up for the filling (check out the photos above for crowned figs)
14. Put the feta, rosemary, pepper, and lemon juice in a bowl. Mash and mix well.
15. Stuff each fig with about 1 tsp. of the feta mixture, taking care not to tear the fig open all the way. Divide any leftover mixture between the figs. 
16. Put both filets and the stuffed figs on the baking tray and into the oven for 15 - 20 minutes. Since the salmon is wrapped, it won't dry out in 20 minutes, but don't cook it for much longer than that.
17. Remove from the oven.
18. Mound 1 cup of arugula on a plate, leaving room for the wrapped salmon.
19. Arrange 4-5 roasted figs on the arugula leaves.
20.  Flip the salmon seam-side up onto the serving plate next to the figs.
21. Unwrap the salmon and enjoy! Discard the fig leaves though... they're not that good.

Thursday, August 1, 2013

WALNUT-RED PEPPER DIP: MUHAMMARA

Long on hunger, short on time? Make muhammara! It will quickly become one of those things that you always serve when people come over, or even when no one comes over. And the colour is gorgeous... never hurts to be around good looking people and good looking food!

Simply omit the bread to make it gluten-free.


Walnut-Red Pepper Dip: Muhammara
Servings: makes about 2 cups

- 1 jar roasted red peppers (capsicum), drained or 2 - 3 fresh red capsicum, roasted
- 2 - 3 cloves garlic, peeled
- 1/2 cup walnut halves, toasted if you want
- 1-1/2 - 2 tbsp. pomegranate molasses
- 1-1/2 tsp. crushed red pepper (the kind you put on pizza)
- 1/4 or so of a pita, or a chunk/slice of any other bread (omit for a gluten-free dip)
- 1 tsp. salt, or to taste
- 1 - 2 tbsp. olive oil
- 1/2 tsp. cumin (optional)

1. Put everything in a food processor or blender.
2. Process till you get a well blended dip.
3. Adjust seasonings to taste.
4. Enjoy with pita, any other bread, over grilled chicken, or with crudites.

Notes:
1. Pomegranate molasses is easily available at any Middle Eastern store. You can also reduce 1/2 cup of pomegranate juice and use that instead of pomegranate molasses.
2. Make it gluten-free: omit the bread.