Monday, August 12, 2013

KING SALMON IN FIG LEAVES, ROASTED FETA-STUFFED FIGS

This recipe looks deceptively complicated... from washing the fig leaves to eating, it took all of 20 - 25 minutes! The roasted, feta-stuffed fresh figs are just as quick to whip up, and so addictive! Figs, unlike bananas, peaches, nectarines, and many other fruits, don't ripen off the tree. So if you buy figs in a package, chances are you've got a few less-than-perfectly-ripe ones. And those semi-ripe ones are not the best for eating raw. But they're perfect for roasting because it brings out the sweetness even in slightly unripe figs. And, the saltiness of the feta and peppery arugula leaves complement the honey-like flavour of roasted figs.

Fig leaves are so under-rated and overlooked... the leaves themselves are not the best for eating, but they are perfect for cooking. They look stunning, have a delicious warm coconut-y aroma when they're roasted, and hold up very well so no dealing with a lost sauce. 

I've roasted salmon and monkfish in fig leaves and they're both winners! During fig season, most farmer's markets and specialty grocery stores sell fig leaves. If you're in California, chances are you, a neighbour, or someone-you-know's neighbour has a fig tree or two. So then you have fig leaves whenever you want... or at least, often. Or maybe someone you know works at a project site with fig trees and rosemary hedges and lemon trees and olive trees and apple trees and avocado trees nearby. It can happen.


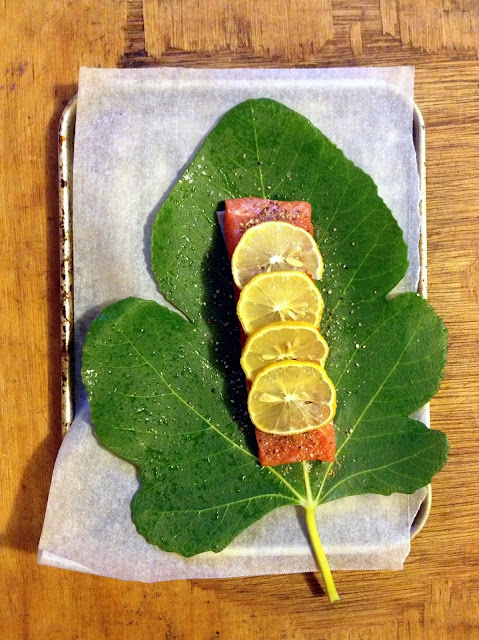


King Salmon in Fig Leaves, Roasted Feta-Stuffed Figs
Servings: 2

for the salmon:
- 2 4 oz. filets of King Salmon or any other salmon, preferably skin-on
- 2 large fig leaves (or 4 medium)
- 1 lemon, preferably organic
- 1 tbsp. olive oil
- freshly ground black pepper, to taste
- salt, to taste

for the figs:
- 8 or 10 fresh, ripe or slightly unripe figs, washed
- 1 sprig fresh rosemary, or 1 tbsp. dry rosemary, chopped (optional)
- 4 oz. feta or chevre 
- 1/2 lemon, juiced
- 1 tbsp. freshly ground black pepper
- 2 cups arugula (or other greens)


1. Preheat oven to 350 F/180 C.
2. Rinse fig leaves and pat them dry.
3. Slice the ends off the lemon, slice the lemon into approximately 8 thin slices.
4. Lay a fig leaf flat on a cutting board, plate, or directly on the baking tray.
5. Place the salmon lengthwise on the centre of the fig leaf and generously season with salt and pepper.
6. Arrange 4 of the lemon slices on the salmon, overlapping each slice.
7. Drizzle 1/2 tbsp. olive oil over the salmon.
8. Wrap the top of the fig leaf over the salmon, then wrap the sides, and then the stem-end. You should now have a neat salmon packet.
9. Flip so that the seams are facing down to keep the packet closed during cooking.
10. Repeat with the second filet.
11. Now work on the stuffed figs. You can stuff the figs first, then prep the salmon but the cheese stuffing might get runny - it'll still be good.
12. Slice the stem-end off each fig and cut an X into the fig, stopping short of cutting all the way through.
13. Set each fig down, cut side up, and gently squeeze the round base of the fig so the fig 'crowns' or opens up for the filling (check out the photos above for crowned figs)
14. Put the feta, rosemary, pepper, and lemon juice in a bowl. Mash and mix well.
15. Stuff each fig with about 1 tsp. of the feta mixture, taking care not to tear the fig open all the way. Divide any leftover mixture between the figs. 
16. Put both filets and the stuffed figs on the baking tray and into the oven for 15 - 20 minutes. Since the salmon is wrapped, it won't dry out in 20 minutes, but don't cook it for much longer than that.
17. Remove from the oven.
18. Mound 1 cup of arugula on a plate, leaving room for the wrapped salmon.
19. Arrange 4-5 roasted figs on the arugula leaves.
20.  Flip the salmon seam-side up onto the serving plate next to the figs.
21. Unwrap the salmon and enjoy! Discard the fig leaves though... they're not that good.

Thursday, August 1, 2013

WALNUT-RED PEPPER DIP: MUHAMMARA

Long on hunger, short on time? Make muhammara! It will quickly become one of those things that you always serve when people come over, or even when no one comes over. And the colour is gorgeous... never hurts to be around good looking people and good looking food!

Simply omit the bread to make it gluten-free.


Walnut-Red Pepper Dip: Muhammara
Servings: makes about 2 cups

- 1 jar roasted red peppers (capsicum), drained or 2 - 3 fresh red capsicum, roasted
- 2 - 3 cloves garlic, peeled
- 1/2 cup walnut halves, toasted if you want
- 1-1/2 - 2 tbsp. pomegranate molasses
- 1-1/2 tsp. crushed red pepper (the kind you put on pizza)
- 1/4 or so of a pita, or a chunk/slice of any other bread (omit for a gluten-free dip)
- 1 tsp. salt, or to taste
- 1 - 2 tbsp. olive oil
- 1/2 tsp. cumin (optional)

1. Put everything in a food processor or blender.
2. Process till you get a well blended dip.
3. Adjust seasonings to taste.
4. Enjoy with pita, any other bread, over grilled chicken, or with crudites.

Notes:
1. Pomegranate molasses is easily available at any Middle Eastern store. You can also reduce 1/2 cup of pomegranate juice and use that instead of pomegranate molasses.
2. Make it gluten-free: omit the bread.

Sunday, July 28, 2013

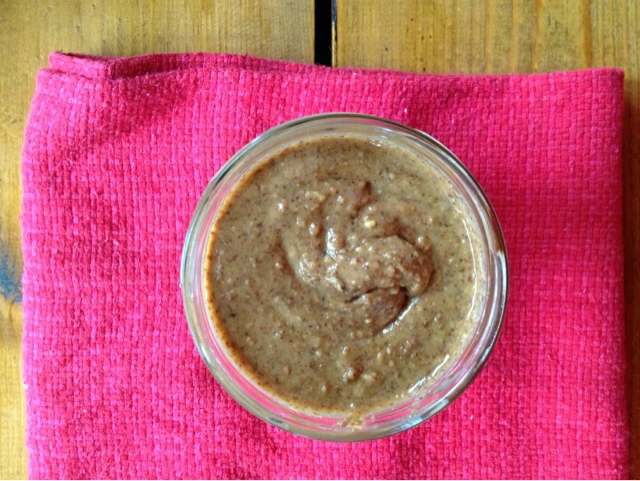
GO NUTS: HOMEMADE ALMOND BUTTER

You guys have to make this make itself! Because that's what almond butter does. It makes itself. (Sorry, the photos are a bit rubbish, but I was too eager to make the almond butter so I could have it in my smoothie that evening.)

It's heavenly on toast but get creative... on ice cream, on waffles, as a dip mixed with cinnamon, honey and cocoa powder, as a savoury dip mixed with roasted garlic, lemon, salt, chili powder, cinnamon, and whatever other spices you want, orrrr just by the spoonful!

Just make it, and it'll inspire you to get creative with it.


Almond Butter
Makes: 2 cups

- 2 cups dry-roasted almonds (I use 50% Less Salt dry-roasted almonds from Trader Joe's)
- food processor

1. Put the almonds in the food processor.
2. Start the food processor.
3. Stop-and-go till you get almond butter, loosening the almond meal/paste from the sides as needed.
4. The almonds will go through a few stages - chopped, ground, pasty, smooth (almond butter).
5. If you're adding honey, spices or other things, add them when the almonds are pasty, or just before removing the almond butter from the food processor.
6. Enjoy!

Notes:
1. Raw almonds, like all raw nuts and seeds, are quite heavy on the digestive system and I don't recommend using them for almond butter or for eating.
2. Blanched or sprouted (soak almonds for 12 - 24 hours in water) almonds would work if you dry them completely first.
3. To dry: put the wet almonds on a towel to "surface-dry", transfer to a pan/baking sheet and let them air-dry in a single layer.

Friday, July 12, 2013

SPICY RAW SOUP: CAN'T HAVE ENOUGH OF THIS

Raw soup, smoothie, blended salad, whatever it is, it's delicious!! I drink at least one or two smoothies a day, usually for breakfast and dinner. I love creating seasonal flavour combinations, and this is one of my go-to, no-fail summer ones. Vary the ingredients and proportions to suit your needs, but be judicious with strong flavours such as salt, spice, garlic, or bitter greens. Try your own combos based on seasonal fruits and vegetables!

I won't endlessly extol the virtues of eating wholesome foods, but suffice to say that eating almost no commercially processed foods, less grains and mostly fruits, vegetables, nuts, seeds, and their derivatives such as oils, is the way to live. After you have this or any other smoothie, notice the rush of energy you feel. Food is also related to mental well-being. Eating fresh, seasonal, life-giving foods will make you a more pleasant, balanced person, able to handle the stresses of work and other things with a cooler, more solid demeanour. And your taste buds will be more sensitive to flavours so you'll enjoy all foods much more.

Try it for a week: have a large smoothie for breakfast, and a large one for dinner. At these meals, if you're still hungry after the smoothie you can have a handful of nuts or as many fruits/vegetables as you want. With a vegetable smoothie like the one below, have vegetables if you're still hungry. With a fruit-based green smoothie, have fruit. Don't mix fruit and vegetables. And, you should have no grains, no dairy, no meat 2-3 hours before or after the smoothie.

And definitely don't put things like almond milk, milk, yogurt, kefir, etc. in your smoothie. Just water or coconut water.


Raw Summer Soup/Smoothie
Servings: makes 1 large soup/smoothie, enough as breakfast/dinner/snack

- 2 medium zuchhini
- 1 cup cherry tomatoes
- 1 avocado
- 2-3 cups greens of choice - spinach, arugula, lettuce (any other than Iceberg), kale, chard
- 1 handful of fresh basil leaves
- 1/4 - 1/2 tsp. crushed red pepper (the kind you put on pizza)
- 1 lemon, juiced
3/4 - 1 tsp. good quality salt
- 1 small clove garlic (optional)

1. Wash, cut and prep everything.
2. Add the heavy vegetables first - anything non-leafy.
3. Leafy things go at the top. In this case the avocado was an after-thought so it's on the top!
4. Add 1/2 - 3/4 cup of water and blend.
5. This will create a "creamy" base before you add more water. (Too much water from the very beginning will result in a non-smooth smoothie - a bit contradictory, really. And definitely not tasty.)
7. Add water, 3/4 cup at a time, until you have the consistency you want.
8. Pour into a glass if you're having it immediately. Otherwise pour into a container and refrigerate. 

Tuesday, July 9, 2013

PEACH, BASIL, AND RICOTTA CROSTINI

The juicy simplicity of summer!


Peach, Basil, and Ricotta Crostini
Servings: makes about 30 crostini

- 1 sourdough baguette, sliced
- 3-4 medium sized ripe peaches or nectarines, cut into 1/8 in. slices
- 15 oz. (425 g) ricotta cheese (I use whole milk ricotta)
- 1 bunch 
or 30-40 leaves, fresh basil
- 1-1/4 tsp. freshly ground coarse black pepper
- 1 tbsp. lemon rind
- 1 small lemon, juiced
3/4 - 1 tsp. salt
- 1 tbsp. brandy or cognac (optional)

1. Preheat the oven to 350 F/180 C.
2. Toast the sliced bread for 7 - 10 minutes, or until just dry and crisp.
3. In a roomy bowl, mix well the ricotta, salt, pepper, lemon juice, lemon rind, and brandy/cognac if using.
4. Take the bread out of the oven and let ir cool for 1-2 minutes.
5. Assemble the crostini: on each slice, stack a tablespoon of the ricotta mixture, 1-2 leaves of basil, 1-2 peach slices.
6. Finish with freshly ground black pepper and a light sprinkle of salt if needed.

Notes:
1. You could do a few spring and summer fruit/vegetable-herb combinations, really... cherry-mint, strawberry-mint/basil, cucumber-dill/basil/cilantro, mango-mint/basil, thinly sliced kumquats-parsley, fresh figs-basil, chives-lemon-olives...

Wednesday, July 3, 2013

ROASTED TOMATILLO AND AVOCADO SALSA/SAUCE

Variety Mexican food is the spice of life.

It, among a few other cuisines, is comfort food to me. Or hangover food. Or hunger food, or party food, or anytime food. I especially love the thousands of different moles and salsas (sauces). Made with fruits, vegetables, chiles, tomatoes, tomatilloes, jitomates, guajes, seeds, nuts, legumes - the list of combinations is endless! You can pretty much blend anything in a Mexican kitchen and it's a mole or a salsa. Or sometimes a beverage.

Too much fun in the kitchen with all the colours and flavours, but here's an easy one to spice things up. Use this as a salsa, sauce for entomatadas (like enchiladas but in a tomato-based sauce rather than a chile-based sauce), as a salad dressing, over roasted vegetables, tamales, eggs, fish, or chicken, mixed into rice as a side dish, or however else you want! Because you won't be able to stop eating it!


Roasted Tomatillo and Avocado Salsa/Sauce
Servings: makes 3 cups

- 10 medium/12 small tomatillos, papery husk and stem removed, rinsed
- 2 medium/3 small shallots, unpeeled and separated (or 1 small white onion, halved)
- 4 medium/6-8 small cloves garlic, skin on
- 1 serrano pepper
- 1 ripe Reed avocado or 2 Hass avocados
- 1 lime, juiced (or more if you want it really tart)
- 1/2 bunch or more cilantro
- 1 tsp sea salt (I use Himalayan salt for everything)


- 1 cast-iron or other heavy skillet - mine's small so I roasted the vegetables in 2 batches
- 1 bowl large enough to fit the roasted vegetables
- 1 lid for the bowl - doesn't have to be air-tight, a plate will do
- blender/food processor

1. In the skillet over medium heat, dry-roast (without using any oil), the tomatillos, garlic, serrano and shallots. If you're using the white onion, place each half cut-side down on the skillet.
2. Roast the vegetables on one side for 5-7 minutes, then turn and roast on the other side for 5-7 minutes, or until the vegetables have dark char spots.
3. Don't burn the vegetables! They should look like they do in the photo above.
4. If you burn the vegetables, go have a margarita and some salty chips and salsa somewhere nice. Start over with the salsa later.
5. Put the hot dry-roasted vegetables in the bowl and cover with the lid. Let it all sit for 10 minutes or longer, till cool enough to handle.
6. Peel the garlic and shallots/onion.
7. Cut the stem off the serrano pepper and de-seed if you want a mild salsa. I usually halve the pepper lengthwise, and de-seed one half, leave the seeds in the other half because I like a bit of smoky heat.
8. Cut the avocado in half, remove the pit, and scoop out the flesh.
9. Blend everything including the roasted vegetables, avocado, cilantro, lime juice, and salt.
10. Blend till the salsa is smooth, not chunky.
11. Adjust to taste... as more lime juice or salt.
12. If you want it spicier, blend in another roasted serrano or half of a raw serrano. Definitely not cayenne or any other dried powdered chile.

Notes:
1. Lemon instead of lime will do in a pinch but lime will give it the fresh tartness rather than the touch of sweetness that lemon imparts to foods.
2. It'll still be delicious so go ahead and use that lemon because you're out of limes.

Tuesday, June 25, 2013

HOW TO EAT FRESH GREEN ALMONDS

A springtime favourite, these won't cost you an almond a leg!

Almonds are a seed, not a true nut. In fact almonds are related to stone fruit - peaches, cherries, apricots, and more! That's why some people with nut allergies can have almonds with no allergic reactions. Fresh green almonds are simply young almonds that haven't matured into the hardened almond pulp - the almond as we know it. With a short season in spring, they are a mild, refreshing treat on a warm afternoon!

People often like to have recipes for everything but I think young almonds are best eaten as just themselves. The whole fruit is edible - including the outer shell with a peach-like fuzz, but sometimes usually I crack it open and just eat the delicate almond inside.


Friday, June 7, 2013

EGGS BAKED IN AVOCADO

There's almost never a day when I am not excited about breakfast! So, a friend sent me this sweet thing:

“When you wake up in the morning, Pooh," said Piglet at last, "what's the first thing you say to yourself?"
"What's for breakfast?" said Pooh. "What do you say, Piglet?"
"I say, I wonder what's going to happen exciting today?" said Piglet.
Pooh nodded thoughtfully. "It's the same thing," he said.


Eggs Baked in Avocado
Servings: makes 1-2 servings

- 1 ripe avocado
- 2 eggs
- 1 tbsp minced lemon basil or other fresh herbs of choice
- 1 tsp crushed red pepper or black pepper
- salt to taste
- 1/2 lime or lemon

Serve with:
Anything, really. Bread, tortillas, roasted potatoes, skinny fries, raw vegetables - radishes, carrots, zucchini, cucumbers...

1. Preheat oven/toaster oven to 450 F/230 C.
2. Mix the salt, pepper, and herbs. Set aside.
3. Cut each avocado in half and remove the pit.
4. Using a spoon, scrape out the center of each halved avocado so that it is large enough to accommodate an egg (about 1-1/2 tbsp).
5. Squeeze lime/lemon juice over the avocados and season with salt, then place on baking sheet. Line the baking sheet if you want, with a baking mat or foil to catch any egg white that spills over.
6. Divide the herb and salt mixture between the avocado holes.
7. Break an egg into the center of each avocado. It's quite alright if some of the white spills out - it will. But the yolk should remain intact.8. Bake in the oven until whites are set and yolk is runny, about 10 to 12 minutes.
9. Bake for longer if you like firmer yolks, but no more than 15 minutes otherwise the whites will become too tough and rubbery.
10. Or, after 10 minutes, turn off the oven and leave the avocados in for 5-7 more minutes.
11. Remove from oven and let the avocados cool for a couple of minutes before digging in!

Notes:
1. This works well with any herbs. Well, not lavender I suppose. But in the spring mint, dill, and fennel leaves are lovely, sage and rosemary are eternal fall/winter favourites, and tarragon, cilantro, and many varieties of basil, for example, are all over summer.
2. Don't overcook the eggs or you'll ruin this dish. Really.

Thursday, May 23, 2013

SKINNY DIPPING: FRESH FAVA BEAN DIP

It's no secret that I love dips... eating them and making them. I have a few standard, no-fail, go-to dips for parties or just having around at home for snacking. As most things I like to cook, the dips I make are seasonal. This is one of my favourite springtime dips! Beautiful colour, fresh tasting, herb-y...

... and fat-free if you don't add olive oil. I often don't add oil because I find the fava beans creamy enough, and I always have olives around, which go well with the dip and bread/vegetables. Or I have a chunk of feta with it all. If I am not serving olives or feta with the dip, I do add the olive oil because the flavour of olives and fresh fava beans is heavenly! 


Fresh Fava Bean Dip
Servings: makes 1-1/2 cups

- 1-1/2 lbs. (~1 kg) fava beans/broad beans, shelled (about 1-1/2 cups shelled beans)
- 3/4 - 1 tsp. salt, I used Himalayan pink salt
- 2 medium cloves garlic
- 1/2 tsp. crushed red pepper
- 1/4 tsp sugar, or less, or none
- 2 tsp. minced fresh mint leaves, or 1 tsp. dried
- 1 tsp. fresh dill, or 1/2 tsp. dried
- juice of 1 small lemon or lime
- 1 tbsp. water or more, as needed to blend or process into the desired consistency
- 2 tbsp. extra virgin olive oil (optional - I don't usually add it)

Serve with:
Bread of any type, baked pita chips, roasted potatoes, skinny fries, raw carrots, zucchini, cucumbers, or as a side with baked/grilled fish

1. Boil enough water to submerge the fava beans up to 1 in. 
2. Add the fava beans and cook for about 5 minutes.
3. Drain and rinse under cold water until cool. Or, drain and let the fava beans cool on their own for about 15 minutes.
4. Using your finger-tips, remove and discard the pale green outer skins and put the bright green fava beans in a bowl.
5. In a food processor or blender, add all the ingredients including the beans.
6. Process/blend to the desired consistency. I like it smooth, not coarse.
7. Refrigerate and remove from the fridge 30 minutes before serving to allow the dip to come to room temperature.
8. Really good the next day, when the flavours have melded!

Notes:
1. Since fava beans, mint, and dill are springtime produce, the flavours are exceptionally complementary. But you can use other herbs like cilantro/coriander or parsley. Or a combination of herbs of your choice. I definitely don't recommend rosemary or any other fall/winter herbs.
2. As always, adjust salt and red pepper to taste, or use freshly crushed black/white pepper.

Thursday, May 9, 2013

CHILES EN ESCABECHE: PICKLED FRESH CHILES (WITH VEGETABLES)

It's no secret that I love pickled vegetables! Of all kinds, from all cuisines. I grew up eating a slew of them, nearly always seasonal. Some that have to be left alone for months before eating, some that you can eat right away. When I was a kid, I ate SO much of our traditional athaanu (Gujarati pickled raw mangoes) with every Gujarati meal, that mum had to put a stop to it - no pickles for me for many months. A variety of pickled stuff would always be at the table during meals, but I couldn't eat any of it. It was tough, really, it was. I love pickles that much.

Even now, the only thing I ask mum to bring me from India is homemade athaanu. I seldom eat the athaanu because Indian food doesn't taste the same here in the US so I don't make it unless someone's asked me to make it for them. But I just feel good having athaanu around and knowing mummy's made it.

Pickles are so old-world, delicious, and I love the progressive transformation of young, fresh, bold, sprightly vegetables thrown in together, into a cohesive, mellow, unified entity in a bottle. It's a bit like growing up together with siblings and cousins.

Anyway so on to the ubiquitous Mexican chiles en escabeche (in Spanish escabechar = to pickle/marinate). I was having friends over so I made these a few days before, to give the vegetables time to get into it a bit. For dinner I'd made enguacatadas (like enchiladas but with an avocado sauce rather than chile sauce), black beans, rice, and probably something else that I can't recall. Perhaps dessert. Who knows... but the pickled chiles and vegetables I really enjoyed making. They're super with everything... beans and rice, in soups, with grilled meats, in sandwiches, chopped and mixed with sour cream as a dip, whatever else you can think of.


Chiles en Escabeche: Pickled Fresh Chiles (with Vegetables)
Servings: makes 1/2 quart

- 1/2 lb. carrots, cut into 1/2 in. slices on the bias
- 1/2 lb. white onions, quartered or cut into eighths
- 1/4 lb. or more, fresh jalapeno or Serrano chiles, or both
- 1/4 lb. or more, cucumbers cut into 1/2 slices on the bias
- 1 head garlic, separated into cloves and peeled
- 3 bay leaves
- 1/4 tsp whole black peppercorns
- 3/4 tbsp. dried Mexican oregano (Italian will do)
- 3 sprigs fresh thyme
- 3 sprigs fresh marjoram
- 1 tsp. salt
- 1 cup white vinegar
- 1/2 cup water
- 1/4 cup olive oil

1. Combine the vegetables and spices in a large glass jar.
2. Bring the vinegar and water to a boil, remove from heat and add olive oil, stirring to combine.
3. Pour pickling mixture over the vegetables in the jar, mix well, cover and marinate 4 days before using.
4. After the 4 days, keep pickled vegetables in the refrigerator for longer storage.